

DeChaff
DeChaff prepares sermon recordings for podcast distribution. Drop in a raw audio file and it cleans the audio, normalises loudness, encodes to MP3, and adds chapter markers with ID3 tags — all in one step.
DeChaff User Guide
DeChaff prepares sermon recordings for podcast distribution. Work through five steps — Load, Trim, Info, Chapters, Output — then click Process. The app cleans the audio, normalises loudness, encodes to MP3, and adds chapter markers with ID3 tags automatically.
The five steps
Step 1 — Load
Drop an audio file onto the drop zone, or click Choose File…
Supported formats: WAV, MP3, M4A, AIFF, FLAC, CAF.
Once the file loads, DeChaff reads the waveform and shows the duration. Click Next to continue. You can also drop a file directly onto any step — the app will load it and take you to Step 2.
Step 2 — Trim
The waveform shows the full recording. Two orange handles mark the trim-in (start) and trim-out (end) — only audio between them is processed. Use this to cut mic noise before the service starts and dead air at the end.
Setting trim points
- Drag the orange handles directly on the waveform.
- Or move the playhead and press I to set the in point, O to set the out point.
- Or click Set In / Set Out in the toolbar to snap to the current playhead position.
Playback
- Click anywhere on the waveform to jump to that position.
- Press Space to play/pause.
Zooming in for precision
- Scroll vertically on the trackpad to zoom in — the waveform shows higher detail as you zoom.
- Scroll horizontally to pan when zoomed in.
- A scrollbar appears below the waveform when zoomed; drag it to pan.
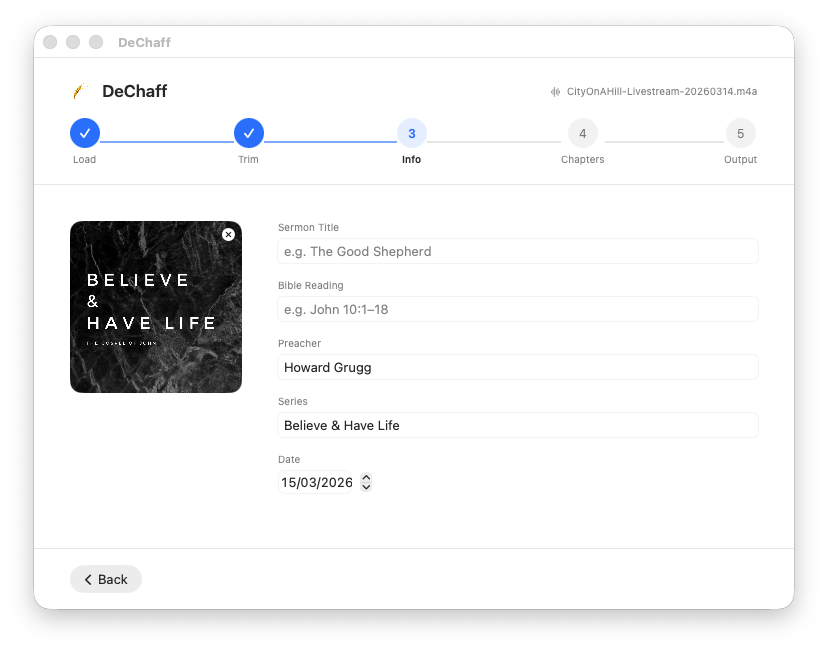
Step 3 — Info
These fields are embedded in the MP3 as ID3 tags and used to build the output filename.
| Field | Notes |
|---|---|
| Sermon Title | e.g. The Saving Power of Jesus |
| Bible Reading | e.g. Romans 1:16–17 |
| Preacher | Speaker name — remembered between sessions |
| Series | Sermon series title — remembered between sessions |
| Date | Defaults to today. The year is embedded in the ID3 tag; the full date prefixes the filename. |
| Artwork | Drag an image onto the square, or click to choose a file. Remembered between sessions. |
Output filename is built automatically:
YYYY-MM-DD Sermon Title, Bible Reading | Preacher | Series.mp3If no tags are filled in, the file is named <original>_dechaff.mp3.
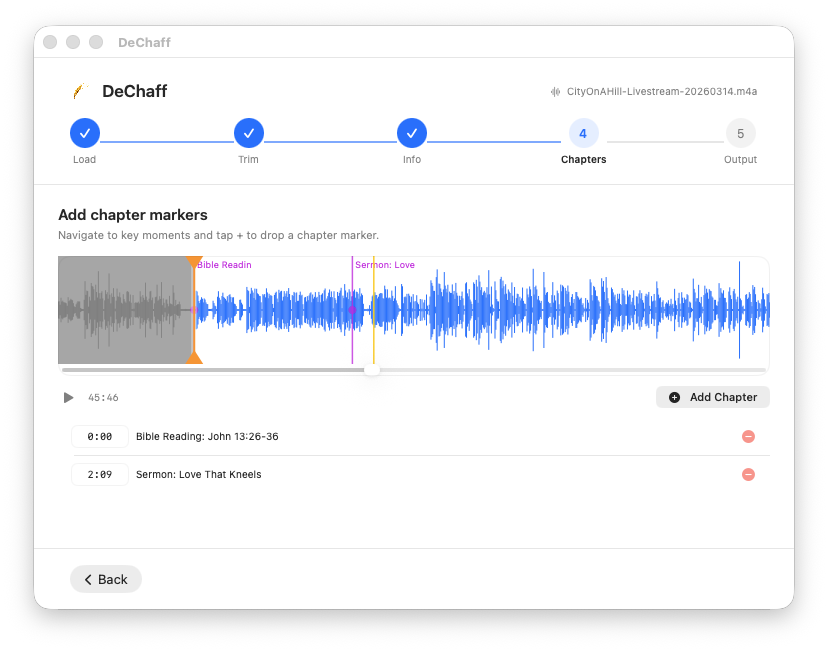
Step 4 — Chapters
Chapters appear as markers on the waveform and as a navigable chapter list in podcast apps.
Adding chapters
- Play or scrub to the moment you want to mark, then click + Add Chapter.
- The first chapter is placed at the very start of the trimmed recording and pre-labelled Bible Reading (using the text from the Info field if filled in).
- The second chapter defaults to 2 minutes in and is pre-labelled Sermon.
- Further chapters are placed at the current playhead position.
Editing chapters
- Drag a chapter marker on the waveform to reposition it.
- Click the time field in the list and type a time directly (
m:ssorh:mm:ss). - Click the title field to rename a chapter.
- Click the − button to delete a chapter.
Chapter times are in output time — relative to the trim-in point. A chapter at 0:00 plays at the very start of the trimmed recording regardless of where the trim-in handle sits on the original file.
Step 5 — Output
Review the processing options and click Process when ready.
Audio Processing
| Option | Default | What it does |
|---|---|---|
| Voice Isolation | On | Apple's voice isolation engine removes background noise, room reverb, and crowd sounds. |
| Dynamic Compression | On | Evens out volume differences — quieter passages are brought up, peaks are controlled. |
| Loudness Normalisation | On | Adjusts overall level to a target LUFS. Default −16 LUFS suits most podcast platforms. A built-in peak limiter prevents clipping. |
| Mono Output | On | Mixes down to a single channel. Recommended — speech recorded in stereo wastes file size without benefit. |
| Shorten Long Silences | On | Finds pauses longer than the threshold and trims them. Default maximum is 1.0 s. |
Output Format
| Option | Default | Notes |
|---|---|---|
| Format | MP3 | WAV produces a larger uncompressed file. |
| Bitrate | 64 kbps | 64 kbps is fine for speech; use 128 kbps+ if music quality matters. |
Extras
| Option | Default | Notes |
|---|---|---|
| Transcribe Audio | On | Generates a text transcript using on-device speech recognition. Requires macOS 26+. The transcript appears on the done screen and can be copied to the clipboard. |
After processing
When processing finishes, the done screen shows:
- The output filename with a Reveal in Finder button
- The transcript (if transcription was enabled), with a Copy button
To process another file, click Process Another or drop a new file onto the window.
Tips
- Trim precisely — zoom into the waveform at the start and end to place handles exactly, or use the I/O keys while playing back.
- Shorten silences — the default 1.0 s works well for most sermons. Too short and the delivery can feel rushed; too long and pauses drag.
- Chapter timing — if you're unsure where a section starts, play the recording and press + Add Chapter at the right moment. You can always drag the marker afterwards to fine-tune it.
- Preacher and Series are remembered between sessions — you only need to update them when they change.
- Artwork is also remembered between sessions. Set it once and it will be embedded in every recording until you change it.
Podcast page posting format
- Embed youtube video
- Audio object
- Embed tab
- Upload MP3
- Title: Sermon Title, Reading Reference
- Author/Artist: Preacher
- Podcasting tab
- Title: Sermon Title, Reading Reference | Preacher
- *Subtitle: *Series
- Summary:
<h2>Title</h2><p>Preacher: Preacher</p><p>Date: DD/MM/YYYY</p><p>Series: Series</p><p>Reading: Reading Ref</p><p>Description</p>
- Episode Duration: Duration of mp3
- Description
- Upload MP3